
New Product Detail: Tampier Quadrant & VRS Hub Unit!
- vonrickenbecker
- Aug 23, 2020
- 9 min read
A Brief Note About Ongoing Projects
Before we dive into the details of the upcoming Tampier Quadrant and accompanying VRS Hub unit, I wanted to take a moment to recap my product roadmap and update you on how things stand today.
As you may recall from earlier logbook entries, I had originally planned to release the Tampier Quadrant and Sopwith Rudder Bar around the same time, targeted for mid-2020. Unfortunately, developments transpired as developments always do, and those timelines have slid a bit. I am very pleased with how the final design of the Tampier is coming together, and I think it will be a fantastic piece of hardware.
The VRS Hub, while it was a significant investment in time and learning new skills, will be worth it in the long run, as it provides a common electronic foundation for all of my future products. Once you have purchased a Hub Unit (either bundled with the Tampier Quadrant or as a separate unit), you should never need to buy another! All of my future products -- from rudder bars to switches, buttons, and beyond -- will interface with the Hub. Additionally, something about the clean and modular design of the hub just appeals to my inner hardware nerd, and I think it will to you as well!
On the subject of the Sopwith Rudder Bar, I have reached the conclusion that my initial MK1 prototype is flawed in its design, and I am going back to the drawing board. The main challenge is proving to be designing a robust and functional mechanical system which provides realistic felt forces while still preserving the aesthetic of the original item. I have several more ideas to try; the MK1 was simply the easiest to implement and was therefore the one I tried first. I am very confident that I will find a solution soon, especially once the Tampier is in production and I can devote more R&D time to the rudder bar.
Without further ado, let’s explore the features of this new equipment!
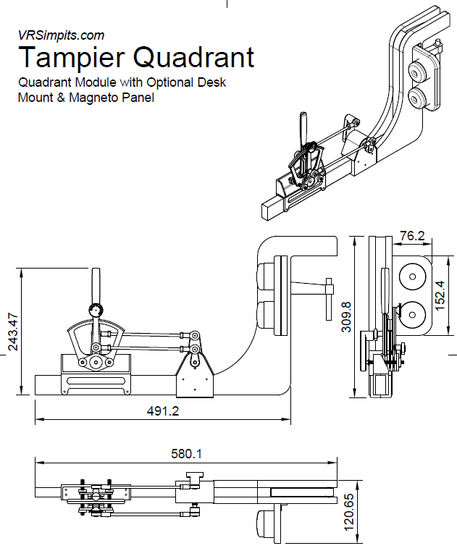
Tampier Quadrant
(Throttle & Mixture Controls)
Note: Final prototype is in final stages of construction, so all images shown here are renders from CAD. Real photos coming very soon!

Technical Specifications:
Length: 46.6cm (Base Unit), 49.1cm (With Desk Clamp Mount)
Height: 24.8cm (Base Unit), 31cm (With Desk Clamp Mount)
Width: 8.5cm (Optional Magneto Panel adds 7.6cm)
Game Inputs*: 2 Analog Axes (Throttle & Mixture), Optional Magneto Panel adds 2 Toggle Switches (Choice of SPST or DPDT)
Mounting Options: Desk Clamp (For tables up to 4.5cm thick), Floor-Stand, or DIY
*Requires a VRS Hub or DIY controller board to interface with your PC


History

The original Tampier Quadrant was manufactured by the Rene Tampier Company, and variants of the quadrant equipped the majority of rotary-engine fighters of the Entente forces, including the Sopwith Pup, Triplane, and Camel, Nieuport Scouts, and many others. Many of the rotary engines of these aircraft used Tampier’s fuel-valve system and “Bloctube” style carburetor. The smaller of the two levers on the quadrant controlled the fuel valve, while the taller lever actuated the carburetor’s airflow control, which acted more or less as a primitive throttle. The quadrant would typically be mounted on the left of the cockpit, usually rather low next to the pilot’s hip, placing it within easy reach of the pilot’s left hand. Several iterations of the Tampier Quadrant were made with varying finishes and colors, some with two levers, and some with only one, depending on the type of engine it was used to control.
The specific variant of the Tampier that I have chosen as the reference for my quadrant is that used in the Sopwith Camel, several examples of which are pictured here, in various states of restoration.


Mechanical Design

The VRSimpits Tampier Quadrant is made to replicate as closely as possible the dimensions, appearance, and feel of the original Tampier Quadrant, though of course with small modifications arising from the fact that this unit is made from plastic, not steel. While every effort has been made to ensure that this replica is as close to the real thing as possible, I cannot guarantee 100% accuracy to the original. Information on these quadrants is hard to come by, and original specimens even rarer. However, by working from what drawings, schematics, and photos are available, I believe I have created a facsimile that would be difficult to distinguish from the original!
The replica quadrant components (throttle and mixture levers, and the scale they are mounted upon) are cast from a durable polyurethane resin, just like the SopGrip. The levers of the quadrant rotate about a steel axle which is fixed to the quadrant scale. The levers are retained by thin plates, which also allow one to tune the tension of the levers as desired using the thumb nuts on each end of the retaining plate. Tightening the thumb nuts causes the retaining plate to press more firmly against the hub of the lever, increasing the friction in the mechanism. The quadrant is mounted upon a 3D-printed bracket which closely approximates the appearance of the folded sheet metal brackets used in the real aircraft.
The axis sensors (potentiometers) are housed in a separate unit just forward of the quadrant itself, constructed from 3D-printed plastic. The levers of the quadrant are connected to this unit via two adjustable tie-rod mechanisms, which is in fact very similar to how the real quadrant would be connected to the engine. I discovered during development that there really wasn’t a way to incorporate sensors into the quadrant itself without compromising the appearance of the quadrant and deviating from the design of the original item. It is for that reason that I chose to house the sensors in a separate unit, and I rather like the result! In fact, I think the addition of the tie-rods actually adds to the realism of the unit.
In a real aircraft, the quadrant would have been attached to one of the fuselage longerons (structural members) passing through the cockpit wall. Inspired by this, I have chosen to mount the entire Tampier apparatus upon a wooden base of similar dimensions and material to such a longeron. The result is a unit which, in my humble opinion, really captures the look, feel, and functionality of the original Tampier quadrant!
Electronics

The Tampier Quadrant features two axes - Mixture and Throttle. Each axis is read by a high quality industrial-grade potentiometer manufactured in Germany, which is rated to a minimum lifespan of 500,000 cycles. Even assuming a heavy amount of use (several hours of flying per day, 365 days per year), these potentiometers should give over 25 years of service! I did investigate the use of hall-effect sensors in place of potentiometers, but ultimately did not choose this solution due to cost, complexity, and compatibility with future products (namely the forthcoming SlipStream VR system that I am developing for wind effects simulation). I think the choice of these high-quality potentiometers will allow me to give you a robust and reliable game controller that should last for many, many years! The output from the potentiometers travels through a single cable which terminates at a GX-16 aviation grade connector, which can be plugged directly into the corresponding port on the VRS Hub unit (see next section for information on this unit).
Mounting Options
There are several options for mounting the Tampier Quadrant to your simulator setup. First, we have the optional desk mount: this unit consists of a sturdy plywood bracket, which is build to reflect the materials and construction found in actual WW1 aircraft. When attached to the Quadrant, the complete unit would not look out of place in a real WW1 cockpit! The desk mount places the base of the quadrant approximately 9 in (23 cm) below the top of your desk; the optimal height to place the top of each lever within easy reach of your hand during flight.
Next, I am also working on a floor-based stand for the quadrant, which will be made to look like a section of cockpit wall, with ribs and longerons. This stand will place the quadrant at the correct height for use with seated desk setups with a desk height of approximately 30 inches (76cm), which is the average height for most computer desks in the US. This floor mount will not be available when the Tampier is first released, but will be available at a later date.
Finally, there are an infinite number of DIY solutions for mounting the Tampier quadrant to your simpit! The fact that the unit is built around a length of hardwood makes it very simple to drill, clamp, or bolt the unit to your custom flight sim cockpit.
Ordering Options and Prices
Note: All prices are estimates, and may change between time of posting and product release
There will be several variants of the Tampier Quadrant available for purchase, and you can pick the one that works best for your situation. Whether you want a complete turnkey system, or are a DIY-er who would like to customize, we have you covered!
Tampier Quadrant: Display Version
Forecast MSRP: $94.99 USD

For those who wish to have a unit only for display purposes, or perhaps for engineering your own mechanics and electronics, I plan to offer a version with only the quadrant itself mounted to a shortened piece of longeron, as shown above.
Tampier Quadrant: Basic Edition
Forecast MSRP: $189.99 USD

With the basic edition, you will receive the quadrant itself with full linkage mechanism, including potentiometers and output wiring, but without a VRS Hub unit. If you are a DIY-minded person with prior experience making your own controllers, this may be the most appealing option to you. The signal from the potentiometers may be fed to an Arduino or similar controller loaded with firmware such as MMJoy or Freejoy, or custom firmware of your own creation.
Tampier Quadrant Standard Edition
Forecast MSRP: $259.99


The standard edition features a Tampier Quadrant bundled with a VRS Hub unit. Not only does purchasing the two as a bundle offer a discount from the combined individual prices, but the VRS Hub can be used with other forthcoming VRSimpits products, including the Sopwith Rudder Bar. One Hub unit is all you need to drive our full suite of current and future controls! With the standard edition, you will need to purchase (or make) a mounting system separately.
Tampier Quadrant Premium Edition
Forecast MSRP: $319.99


The premium edition includes everything in the standard edition, with the addition of the desk clamp mounting system. Purchase of this package will give you a reduced price vs. purchasing the desk clamp separately. Note: the Magneto penal shown mounted to the desk clamp is not included, but will be available for purchase as an add-on at a later date! Purchasing the premium edition bundle gives you a lower total cost as opposed to purchasing each item separately.
As with all VRsimpits products, the Tampier Quadrant will be made to order per your specifications, and I ask that you allow sufficient time for your order to be completed and shipped. Like the SopGrip, the current estimated lead time will be clearly listed along with the ordering information, and a more precise shipping date will be provided to you when available.
Product Detail: VRS Hub Unit

Specifications:
MSRP: $74.99 USD
Inputs:
All Inputs Made Using Aviation Panel Connectors
1x Tampier Quadrant (Throttle/Mixture Axes)
Up to 3x Additional Analog Axes
1x Rudder Bar (Digital Hall-Effect Sensor)
Up to 2x Rotary Encoders
Up to 12x Physical Buttons/Switches
Output:
1x USB Mini Port (USB Mini to USB-A Cable Included)

The VRS Hub is the “brain” that will power many of my products, including the Tampier Quadrant and the Sopwith Rudder Bar. The hub will serve as the central connection point for axis sensors, buttons, switches, and other input devices, facilitating communication with your PC via a USB connection.
This provides a great deal of modularity to the system, giving you the ability to pick and choose different VRSimpits products to your liking. With this system you are free to choose only those controls and devices that fit your needs, with the ability to easily expand your collection with new products later! Another advantage is that this system requires only one USB port on your computer, minimizing the juggling of devices and controller IDs within the game.
Developing the VRS Hub was actually the main contributor to the delay in the Tampier Quadrant’s release. I had originally planned to embed a micro-controller into the Tampier Quadrant itself, but I eventually realized that the Hub approach presented an end-product that is simpler, more elegant, and in the end, cheaper! (When considering its utility for future products) Thus, I made the decision to take a little extra time to develop this unit and ensure that I deliver the best product.
Designing the Hub was a rather challenging undertaking for me, as I am a mechanical engineer by training, and I had no previous experience designing PCBs or electrical systems. But with the help of YouTube and the excellent KiCAD open-source PCB design software, I was soon able to design a PCB that provides a clean, modular way to connect various sensors. The board is built around the STM32 “Blue Pill” micro-controller board, which is an open-source board similar to the Arduino, but packing a much faster 32-bit processor. The VRS Hub’s PCB essentially functions as a breakout -board for the STM32, allowing the end-user to easily add and remove devices at will, no soldering required! The board is powered by the excellent Freejoy firmware developed by community member Magners, whom you may be familiar with from the IL2 forum or the HOTAS/SIMPIT Discord channel.
The VRS Hub’s sensor inputs are all connected via GX-series aviation panel connectors, which are functional, robust, and look great! Each VRS Hub can support one Tampier throttle/mixture unit, one Rudder Bar (digital Hall-effect sensor), up to three additional analog axes, two rotary encoders, and up to 12 buttons or switches.

Comments